Installing the Rotation Switch
Crosstip head screwdriver
Small flathead screwdriver
Pliers
Kit number
14773
Estimated Time
1 Hour

|
To avoid electrical shock or property damage, move the power switch to OFF and disconnect power. |
-
Remove electrical power supplied to the rotisserie.
-
Remove screws securing the side panel closest to the controls.
-
Remove and label wires and MOV capacitor from terminals of switch.
-
For SCR 6, SN: CA0603001 & below and SCR 8, SN: CB0602054 & below
-
Unscrew the back ring of switch and pull out switch from the front of the unit.
-
-
For SCR 6, SN: CA0603002 & above and SCR 8, SN: CB0602055 & above
-
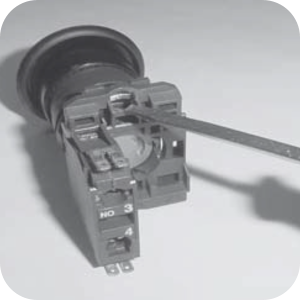
Remove the terminal block assembly by inserting a small, flathead screwdriver in the opening at the top of the switch and pry up to ensure the end of the screwdriver pries up on the silver release bar.
-
Unscrew the back ring and pull out switch from the front of the unit.
-
-
Once removed from the packaging, remove the back ring from new switch.
-
Insert the new switch from the front, aligning the arrow on the switch with the notch in the front panel and then secure the switch to the panel with the back ring.

-
Fit the large notch in the switch onto the “cradle” of the terminal block assembly and snap the two pieces together.
-
Use the 2-bladed terminals to attach wires and MOV capacitor onto terminals of new switch.
-
Replace side panel and restore power.
-
Unit is now ready for operation.
Related Content
Replacing the Drive Motor Capacitor
Replacing the Meat Probe Receptacle
Testing the Relay and Replacing the Drive Motor
SCR Stacking Kit Instructions Short
Rotisserie Stacking Instructions
Troubleshooting a Broken Shaft Adapter Pin
Radiant Heat Deflectors Instructions
Radiant Heat Deflectors Instructions
SCR 6/8 Lamp Guard Installation Instructions
Reference