Applies to:
ALL CUSTOMERS
Retrofitting Adjustable Filter Pan Guide Rail
-
Basic Hand Tools
-
7/16 inch (11 mm) Rachet Wrench
-
7/16 inch (11 mm) Socket Wrench
-
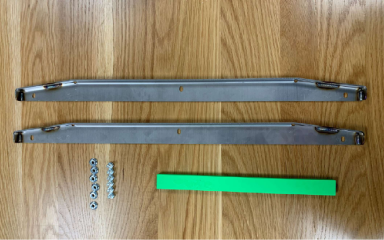
Slotted Filter Pan Guide Rails x2
-
1/4-20 x 1/2 inch Hex Bolts x6
-
1/4-20 x serrated locknuts x6
-
Spacer Bar x1
-
Blue Thread Locker x1
Kit number
140992
Estimated Time
1 hr

|
Only perform this procedure when the unit is cool or severe burns may result. |
This kit is used to replace the existing filter pan guides on F5 units where the gap between the guide and the deck is too large. This condition should be verified with the spacer bar gauge before installation begins.
To replace the filter pan guides:
-
Turn power switch off.
-
Ensure fryer is cool to the touch before moving.
-
Pull out the fryer and unplug from power source.
-
Remove JIB and filter pan.
-
Remove three 1/4-20 locknuts holding each filter pan guide rail and remove the rails.
-
Clear and wipe off any congealed oil as best as possible to provide a clean surface for the spacer bar.
-
Install new guide rails using the bolts and nuts provided in kit with blue thread locker and hand tighten.
-
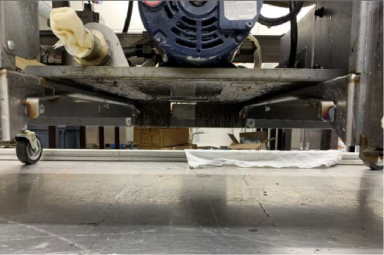
Insert the spacer bar between the guide rail and deck. Push up on the rail and tighten. Repeat for other side.
-
Using a screwdriver, remove the spacer.
-
Push filter pan in and test the fit and proper function.
-
Perform a few filtration tests for leaks.
-
Working in reverse, complete steps 4 through 1 and return fryer to operation.
NOTE: There may be some residual oil from the plug and play. Make sure to fully let it drain into the pan before fully removing and then block is with a paper towel.
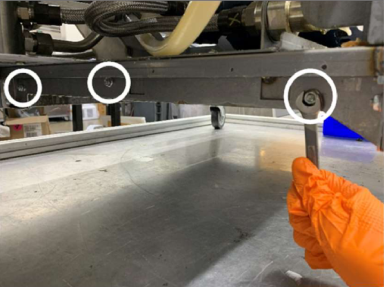
Note for 3 and 4 well fryers: 7/16" (11 mm) socket wrench can be used on the front locknuts. Standard/rachet wrench is required for the middle and rear locknuts due to clearance issues with frame rail and bracing.
NOTE: A flat head screwdriver can be used to help pry the guide rails off if stuck.
![]()
IMPORTANT! There should be no gaps between the deck, spacer bar, and guide rail.
NOTE: Verify lid gasket is in good shape and there are no leaks present during filtration tests.
Related Content
Troubleshooting the Check JIB Message
Selector Valve Port Configurations
Replacing the Selector Valve Motor
Replacing the Port Selector Valve Assembly
Troubleshooting a Drain Pan Switch Failure
Troubleshooting a Change Pad Reminder XX hrs. Error
Troubleshooting an E-82D Selector Valve Error
CE Filter Motor Cover Retrofit
Bulk Dispose and Fill Retrofit
Troubleshooting the Check JIB Message
Selector Valve Port Configurations
Replacing the Selector Valve Motor
Troubleshooting a Change Pad Reminder XX hrs. Error
Troubleshooting a Drain Pan Switch Failure
Troubleshooting an E-82D Selector Valve Error
Troubleshooting a Change Pad Reminder XX hrs. Error
Troubleshooting the Check JIB Message
Troubleshooting a Filter Pan Switch Failure
Troubleshooting an E-82D Selector Valve Error
Replacing the Filter Pan Lid Gasket
Replacing the Port Selector Valve Assembly
Replacing the Selector Valve Motor
Reference