Temp/Level Probe Fitting Replacement
7/8 in. Socket and Ratchet,
1/2 in. Wrench,
Crosstip head screwdriver
Kit number
140593
Estimated Time
30 Minutes

|
To avoid electrical shock or property damage, move the power switch to OFF and disconnect power. |
-
Disconnect power from fryer.
-
Drain oil from vat into filter pan or dispose into a waste container.
-
Use Menu.
-
Filter.
-
Drain.
-
-
Allow vat and heater elements to cool enough to handle. For safety, disconnect power to fryer.
-
Remove left side panel from fryer.
-
Remove compression cap from temp probe low and or level probe top.
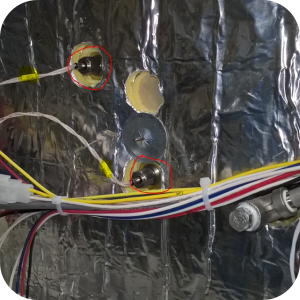
-
Pull / push probe outward of fryer.
-
Remove teflon seal, spacer and cap from probe and discard.
-
Remove nut and washer form fitting, set aside and keep.
-
Remove fitting from vat and discard.
-
Insert O-ring into new fitting.
-
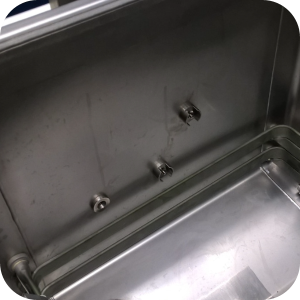
Insert fitting through vat wall from the inside.
-
Align fitting to vat hole for correct orientation.
-
Insert washer then nut onto fitting from outside of vat. Torque to 36 lb-ft.
-
Insert new parts on probe in correct order and orientation, cap, spacer, and Teflon seal (orient with dome end towards probe tip).
-
Insert probe and parts into fitting and start threading cap.
-
Position probe 0.50 in. from vat wall.
-
Position gauge vertically within the slot of the new fitting and against the vat wall.
-
Insert probe to make contact with gauge.
-
Finger tighten cap and then add another 1/2 turn.
-
Fill vat with oil. Check for leaks.
-
Menu
-
FIlter
-
Fill or add new oil.
-
-
Install left side pane and fryer is ready for normal operation.
Related Content
Replacing the High Limit Thermocouples
Replacing the Primary Contactor
High Limit Protection Probe Installation (CE Version built prior to 5/2020, ALL Versions after)
High Limit Protection Probe Installation (UL Version built prior to 5/2020)
Velocity High Limit Adjustment Instructions
Troubleshooting the Solid State High Limit on OXE 100
OXE 100 Troubleshooting the E-5 Oil Overheating Error Code
OXE 100 Troubleshooting the E-6 Temperature Probe Failure Error Code
OXE 100 Troubleshooting the E-10 High Limit Failure Error Code
Lid Latch Adjustment or Replacement
Armored Cable Grounding Installation Instructions for Australia
ZigBee Radio Communication Kit
Velocity Nylatron Vertical Filler Strips Installation Instructions
Selector Valve Motor/Encoder Replacement
Velocity Deadweight Orifice Clean-out Tool Installation and Maintenance
Velocity Lid Cable Replacement
Instructions to replace PXE Interlock Latch Pivot Pin
Front Dispose Addition (for Bulk Oil Units)
Remove Selector Valve to ATO flex tube
Label Replacement Instructions
Menu Card Removal Replacement Instructions
Save and Load Setpoint Instructions
Flexible Line Replacement Kit (Formed Tube), (Standard, Bulk-Oil Fryer)
Flexible Line Replacement Kit (Formed Tube), (Standard, NON Bulk-Oil Fryer)
Replacing the High Limit Thermocouples
Troubleshooting the Solid State High Limit on PXE 100
PXE 100 Troubleshooting the E-5 Oil Overheating Error Code
PXE 100 Troubleshooting the E-6 Temperature Probe Failure Error Code
PXE 100 Troubleshooting the E-10 High Limit Failure Error Code
Velocity Steam Box Swap-out Instructions
Lid Handle Replacement Instructions
Add pressure gauge to PXE unit Instructions (Japan / Hong Kong)
Add pressure gauge to PXE unit Instructions
Reference
Product Racking Recommendations
OXE 100 KFC Annual Inspection Certification
Product Racking Recommendations