Selector Valve Motor/Encoder Replacement
1/8 in. Hex key (allen wrench)
7/16 in. Socket or wrench
Drill gun with crosstip head bit
Ratchet
Blue loctite
Kit number
140617
Estimated Time
20 Minutes

|
To avoid electrical shock or property damage, move the power switch to OFF and disconnect power. |
Procedure
-
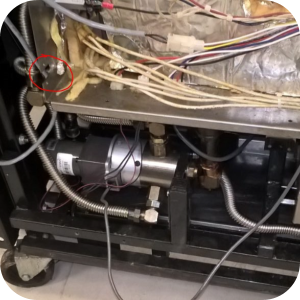
Remove power to fryer and move to allow access to left side panel.
-
Remove left side panel and filter pan.
-
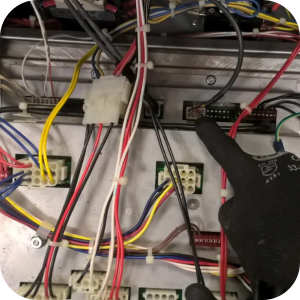
Remove 2 screws holding in control assembly of fryer and rotate down.
-
Unclip harness for selector valve encoder and remove any wire ties holding this harness.
-
Pull through electrical enclosure.
-
Remove 2 screws holding in harness, remove grommet from cable and keep parts for later assembly.
-
Unclip harnesses for selector valve motor and filter pan switch, set aside.
-
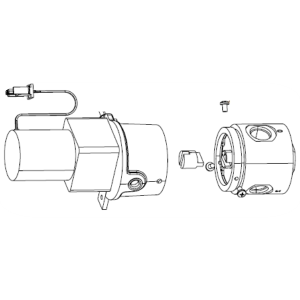
Remove 3X button cap screw from the valve body and encoder and set aside.
-
Remove old motor / encoder assembly from fryer and discard.
-
Remove coupler and set aside.
-
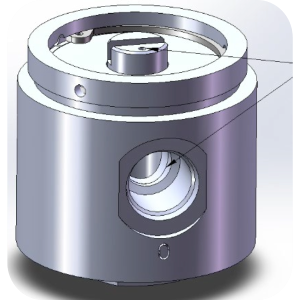
Align spool so that the spool alignment indicator points towards the home port and the home port is full open, if not already.
-
Place coupler back onto spool ensuring the male tang of the coupler engages the spool and is centered.
-
Use some grease on the male tang.
-
Place new motor / encoder assembly on to the spool valve ensuring the motor tang engages the female tang of the coupler.
-
Fully seat the assembly to the spool and align screw holes. May need to exert force to get the screw holes to align by compressing O-ring on spool valve.
-
Apply blue Loctite to the cap screws and reinstall, torque to 34 in-lbs.
-
Clip the new motor wire harness, filter pan switch and new encoder cable back to their original locations and secure.
-
Motor wire pair should be twisted approximately 2 twists per inch.
-
Re-install the rear bracket of the selector valve to the frame.
-
Test selector valve operation using tech mode or in filter mode.
-
Upon successful results, return fryer to service.
Related Content
Replacing the Filter Pump Motor
Replacing the Filter Pump Motor Seal
Replacing the Filter Pump Motor Rollers
Replacing the Selector Valve Motor and Encoder
Replacing the Drain Valve and Actuator
Replacing the Nylatron Vertical Strip
Velocity Nylatron Vertical Filler Strips Installation Instructions
Velocity Deadweight Orifice Clean-out Tool Installation and Maintenance
Velocity Lid Cable Replacement
Instructions to replace PXE Interlock Latch Pivot Pin
Front Dispose Addition (for Bulk Oil Units)
Remove Selector Valve to ATO flex tube
Flexible Line Replacement Kit (Formed Tube), (Standard, Bulk-Oil Fryer)
Flexible Line Replacement Kit (Formed Tube), (Standard, NON Bulk-Oil Fryer)
Troubleshooting Slow Refill No Detect Error on OXE 100
Troubleshooting Bulk Tank Full Message on OXE 100
OXE 100 Troubleshooting the E-18 Level Probe Failure Error Code
OXE 100 Troubleshooting the Oil Not Pumping
Lid Latch Adjustment or Replacement
Armored Cable Grounding Installation Instructions for Australia
ZigBee Radio Communication Kit
Temp/Level Probe Fitting Replacement
Label Replacement Instructions
High Limit Protection Probe Installation (CE Version built prior to 5/2020, ALL Versions after)
High Limit Protection Probe Installation (UL Version built prior to 5/2020)
Menu Card Removal Replacement Instructions
Save and Load Setpoint Instructions
Velocity High Limit Adjustment Instructions
Replacing the Filter Pump Motor
Replacing the Filter Pump Motor Seal
Replacing the Filter Pump Motor Rollers
Replacing the Drain Valve and Actuator
Replacing the Selector Valve Motor and Encoder
Troubleshooting a PXE 100 E-93 Error Code
Troubleshooting Slow Refill No Detect Error on PXE 100
Troubleshooting Bulk Tank Full Message on PXE 100
PXE 100 Troubleshooting the E-18 Level Probe Failure Error Code
PXE 100 Troubleshooting the Oil not Pumping
Velocity Steam Box Swap-out Instructions
Lid Handle Replacement Instructions
Add pressure gauge to PXE unit Instructions (Japan / Hong Kong)
Add pressure gauge to PXE unit Instructions
Reference
Product Racking Recommendations
OXE 100 KFC Annual Inspection Certification
Product Racking Recommendations