JIB Pump Retrofit
Kit number
97657
Estimated Time
30 Minutes to 1 Hour

|
To avoid electrical shock or property damage, move the power switch to OFF and disconnect power. |
-
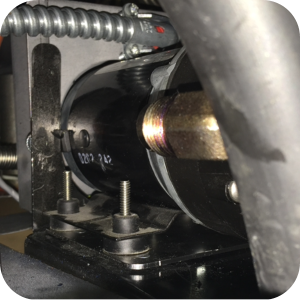
Disconnect power from unit.
-
Remove the old JIB pump by disconnecting the flex lines from each side of the pump leaving the fittings in place. The fittings will be removed in a later step.
-
Remove the 4 nuts that mount the pump to the plate and pull the pump off the plate to expose the wires form the small junction box.
-
The 2 wires from the pump need to be disconnected from the lever nuts.
-
Pull pump out from unit.
-
Remove fittings from old pump and install on the new pump in the same order they were on the old pump.
-
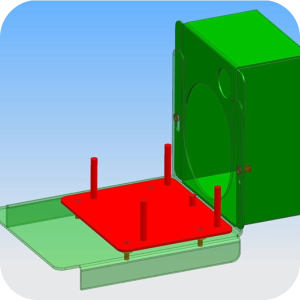
Knock clinch studs out of mounting plate.
-
Before placing the bracket, connect the ground wire with the ring terminal to the shorter stud located in the front-center of the bracket and attach with a nut.
-
Position bracket correctly. The bracket will use the holes left over after removing the studs. This bracket contains the studs to be used for the new bracket in the correct location.
-
With the clinch studs positioned closer to the junction box, fasten with nuts from under existing bracket.
-
Connect wires from new pump to the lever nuts.
-
Place the pump on the unit and on studs. Ensure to tuck the lever nuts and wiring back into the junction box.
-
Fasten the pump in place with nuts on the new studs.

-
Reconnect the two flex lines to the new pump. New pump is now install and unit is now ready to be used.
Related Content
Replacing the Filter Pump Motor
Replacing the Filter Pump Motor Seal
Replacing the Filter Pump Motor Rollers
Replacing the Selector Valve Motor and Encoder
Replacing the Drain Valve and Actuator
Replacing the Nylatron Vertical Strip
Velocity Nylatron Vertical Filler Strips Installation Instructions
Selector Valve Motor/Encoder Replacement
Velocity Deadweight Orifice Clean-out Tool Installation and Maintenance
Velocity Lid Cable Replacement
Instructions to replace PXE Interlock Latch Pivot Pin
Front Dispose Addition (for Bulk Oil Units)
Remove Selector Valve to ATO flex tube
Flexible Line Replacement Kit (Formed Tube), (Standard, Bulk-Oil Fryer)
Flexible Line Replacement Kit (Formed Tube), (Standard, NON Bulk-Oil Fryer)
Troubleshooting Slow Refill No Detect Error on OXE 100
Troubleshooting Bulk Tank Full Message on OXE 100
OXE 100 Troubleshooting the E-18 Level Probe Failure Error Code
OXE 100 Troubleshooting the Oil Not Pumping
Lid Latch Adjustment or Replacement
Armored Cable Grounding Installation Instructions for Australia
ZigBee Radio Communication Kit
Temp/Level Probe Fitting Replacement
Label Replacement Instructions
High Limit Protection Probe Installation (CE Version built prior to 5/2020, ALL Versions after)
High Limit Protection Probe Installation (UL Version built prior to 5/2020)
Menu Card Removal Replacement Instructions
Save and Load Setpoint Instructions
Velocity High Limit Adjustment Instructions
Replacing the Filter Pump Motor
Replacing the Filter Pump Motor Seal
Replacing the Filter Pump Motor Rollers
Replacing the Drain Valve and Actuator
Replacing the Selector Valve Motor and Encoder
Troubleshooting a PXE 100 E-93 Error Code
Troubleshooting Slow Refill No Detect Error on PXE 100
Troubleshooting Bulk Tank Full Message on PXE 100
PXE 100 Troubleshooting the E-18 Level Probe Failure Error Code
PXE 100 Troubleshooting the Oil not Pumping
Velocity Steam Box Swap-out Instructions
Lid Handle Replacement Instructions
Add pressure gauge to PXE unit Instructions (Japan / Hong Kong)
Add pressure gauge to PXE unit Instructions
Reference
Product Racking Recommendations
OXE 100 KFC Annual Inspection Certification
Product Racking Recommendations